After=network.target
defined in it’s systemd service file.
According to this post, you need to be using a network management tool that’s systemd aware, it seems. The article lists two, NetworkManager & systemd-networkd. However, Debian 8 Jessie’s default network manager is still ifupdown where you configure /etc/network/interfaces
. You can use another, but that’s the one that’s there by default according to their wiki.
The problem there is that many systemd services requiring network.target will not work with ifupdown. It’s not systemd aware, or should I say, systemd is not aware of it. I didn’t have this issue unless I was configuring my server to use DHCP (which I rarely need to do). If it was a static IP, the service I was testing (freeswitch) seemed to come up fine. However, I think that’s just a race condition where the network just happens to win every time.
So, I switched to using systemd-networkd on these few servers & it seems to have been working well so far. I didn’t like initially how it seems to take over the stub resolver but that seems to be the way it works.
Some notes on how to set it up:
1 2 3 4 5 6 |
|
1 2 3 |
|
This is required if you want to use the DHCP assigned DNS servers
1
|
|
Make sure to comment out eth0 in /etc/network/interfaces
, then reboot the server to confirm everything comes up OK.
I’m surprised this hasn’t made more noise than it already has. I guess DHCP isn’t that common on linux servers.
I also got a chuckle out of the end of the FreeDesktop article:
]]>If you are a developer, instead of wondering what to do about
network.target
, please just fix your program to be friendly to dynamically changing network configuration. That way you will make your users happy because things just start to work, and you will get fewer bug reports as your stuff is just rock solid. You also make the boot faster for your users, as they don’t have to delay arbitrary services for the network anymore (which is particularly annoying for folks with slow address assignment replies from a DHCP server).
Proxmox v4 Beta as of right now uses linux kernel v4. I updated my homelab to it recently & PCI passthrough (per my previous post) stopped working. Asked on the Proxmox forums & apparently an additional option is required due to the newer v4 kernel:
hostpci0: 01:00.0,driver=vfio
Compared to what was required before:
hostpci0: 01:00.0
Apparently vfio is the way to go with v4 kernels. It should be the default option once Proxmox v4 goes GM.
Update (10/10/2015):
This is the default in v4 GM, so the option is no longer needed.
]]>SmartOS is Joyent’s open source hypervisor built on top of Illumos (Solaris). It supports QEMU/KVM & Zones for virtualization, and includes ZFS, Crossbow, & DTrace. Zones are to SmartOS/Solaris like OpenVZ Containers are to Proxmox, except Solaris has done it a lot longer & you could say it’s more proven. With SmartOS, Joyent has taken a modern approach to it’s binaries, using GNU tools by default (albeit not a true GNU platform). IMO that’s a welcome departure away from Solaris’ Unix roots.
I didn’t grok SmartOS right away. I’m used to installing a type 1 hypervisor on a server’s local drive, but SmartOS is a hybrid of that. It’s primary OS is read-only, & runs from a USB key, CD-ROM, or via PXE boot image over network. When you boot it on a machine, it checks for a ZFS pool called “zones” that’s configured for SmartOS. If it doesn’t see that, it goes through a setup process to create the pool for you. The zones pool contains the configuration specific to the hypervisor itself, as well as storage for the zones/vm’s themselves. Oh yeah, and there’s no GUI (at least not by default)… everything’s configured on the command line. So you can’t just setup a hypervisor quickly by clicking through an installer, you gotta learn how to do it. Luckily the SmartOS Wiki is well written & anyone with some basic command line experience can figure it out.
One thing I didn’t like about the installer is it doesn’t really give you a way to specify the layout of your disks for the zones pool. If you have 4 disks & you select them all, it’ll create a raidz1 pool. Eh, no thanks. What I did was select only two disks so it’d create a mirror, then after the OS was running I created another mirror with the other two disks & striped the two mirrors.
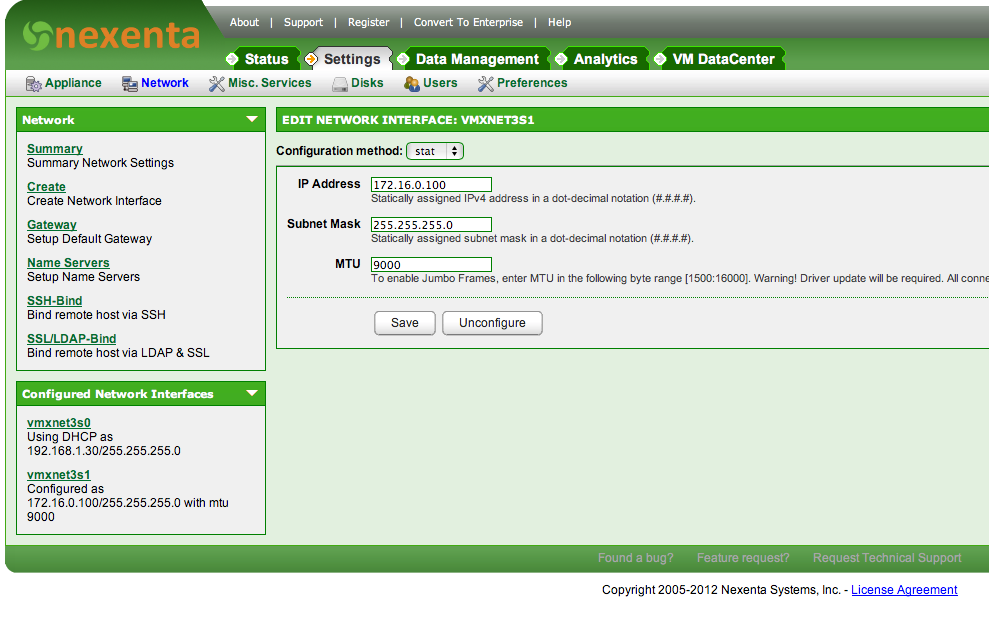
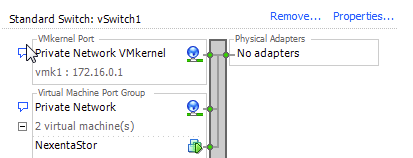
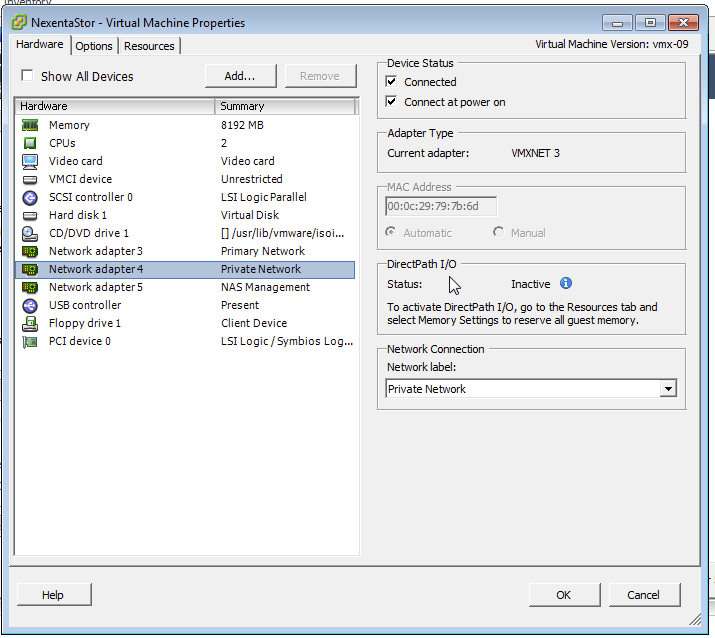
With Crossbow, I was able to set up 2 link aggregate for my VMs to use, and kept the primary interface for admin stuff only. Overkill for a homelab, but why not if my switch supports it? :) The wiki link above describes how to do that. SmartOS applies “tags” to the interfaces, & you can specify to the VM which tag to use. I also found out you can create a “virtual switch” with Crossbow called an etherstub to allow VMs to communicate to each other on a private network.
Setting up the VMs/Zones themselves is pretty easy once you understand it. You can pull in preconfigured images from Joyent’s repositories via imgadm
, or you can install via ISO. The configuration of the VM/Zone is done via a JSON payload file, & there’s even a website to create the config files for you. Remote access to the VM’s console is easily done via VNC or ssh’ing to the host & using zlogin to the zone itself. I’m very glad tab autocomplete works with the UUID’s of the VMs/Zones because those would be a bear to type or copy/paste repeatedly.
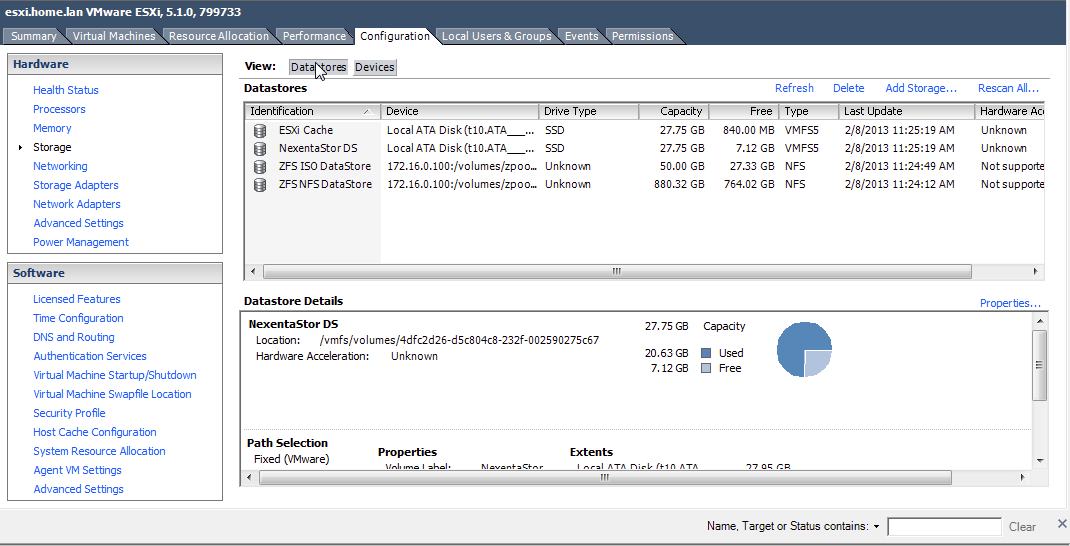
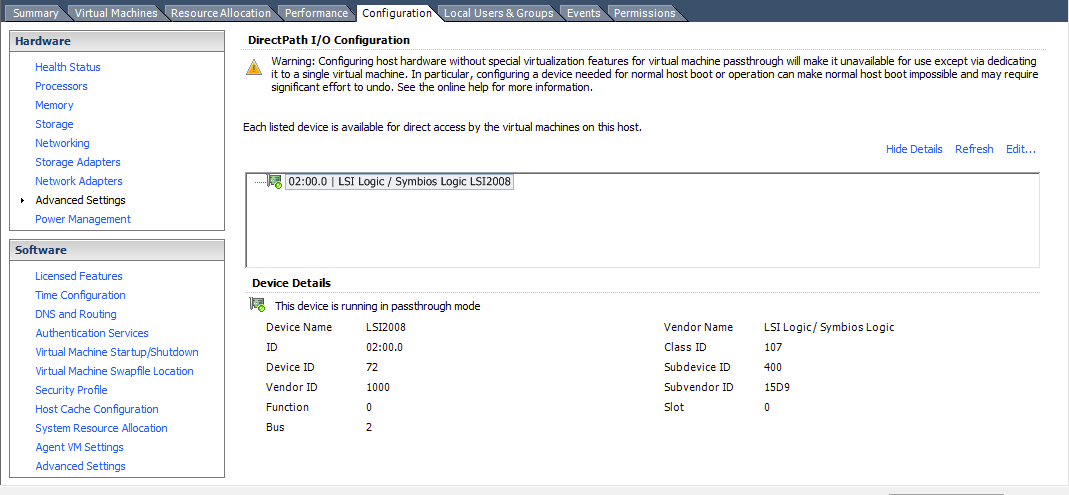
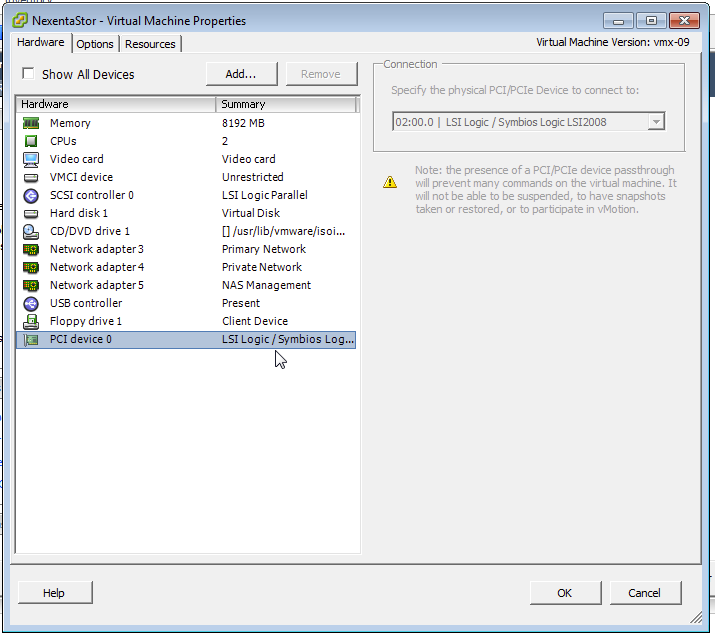
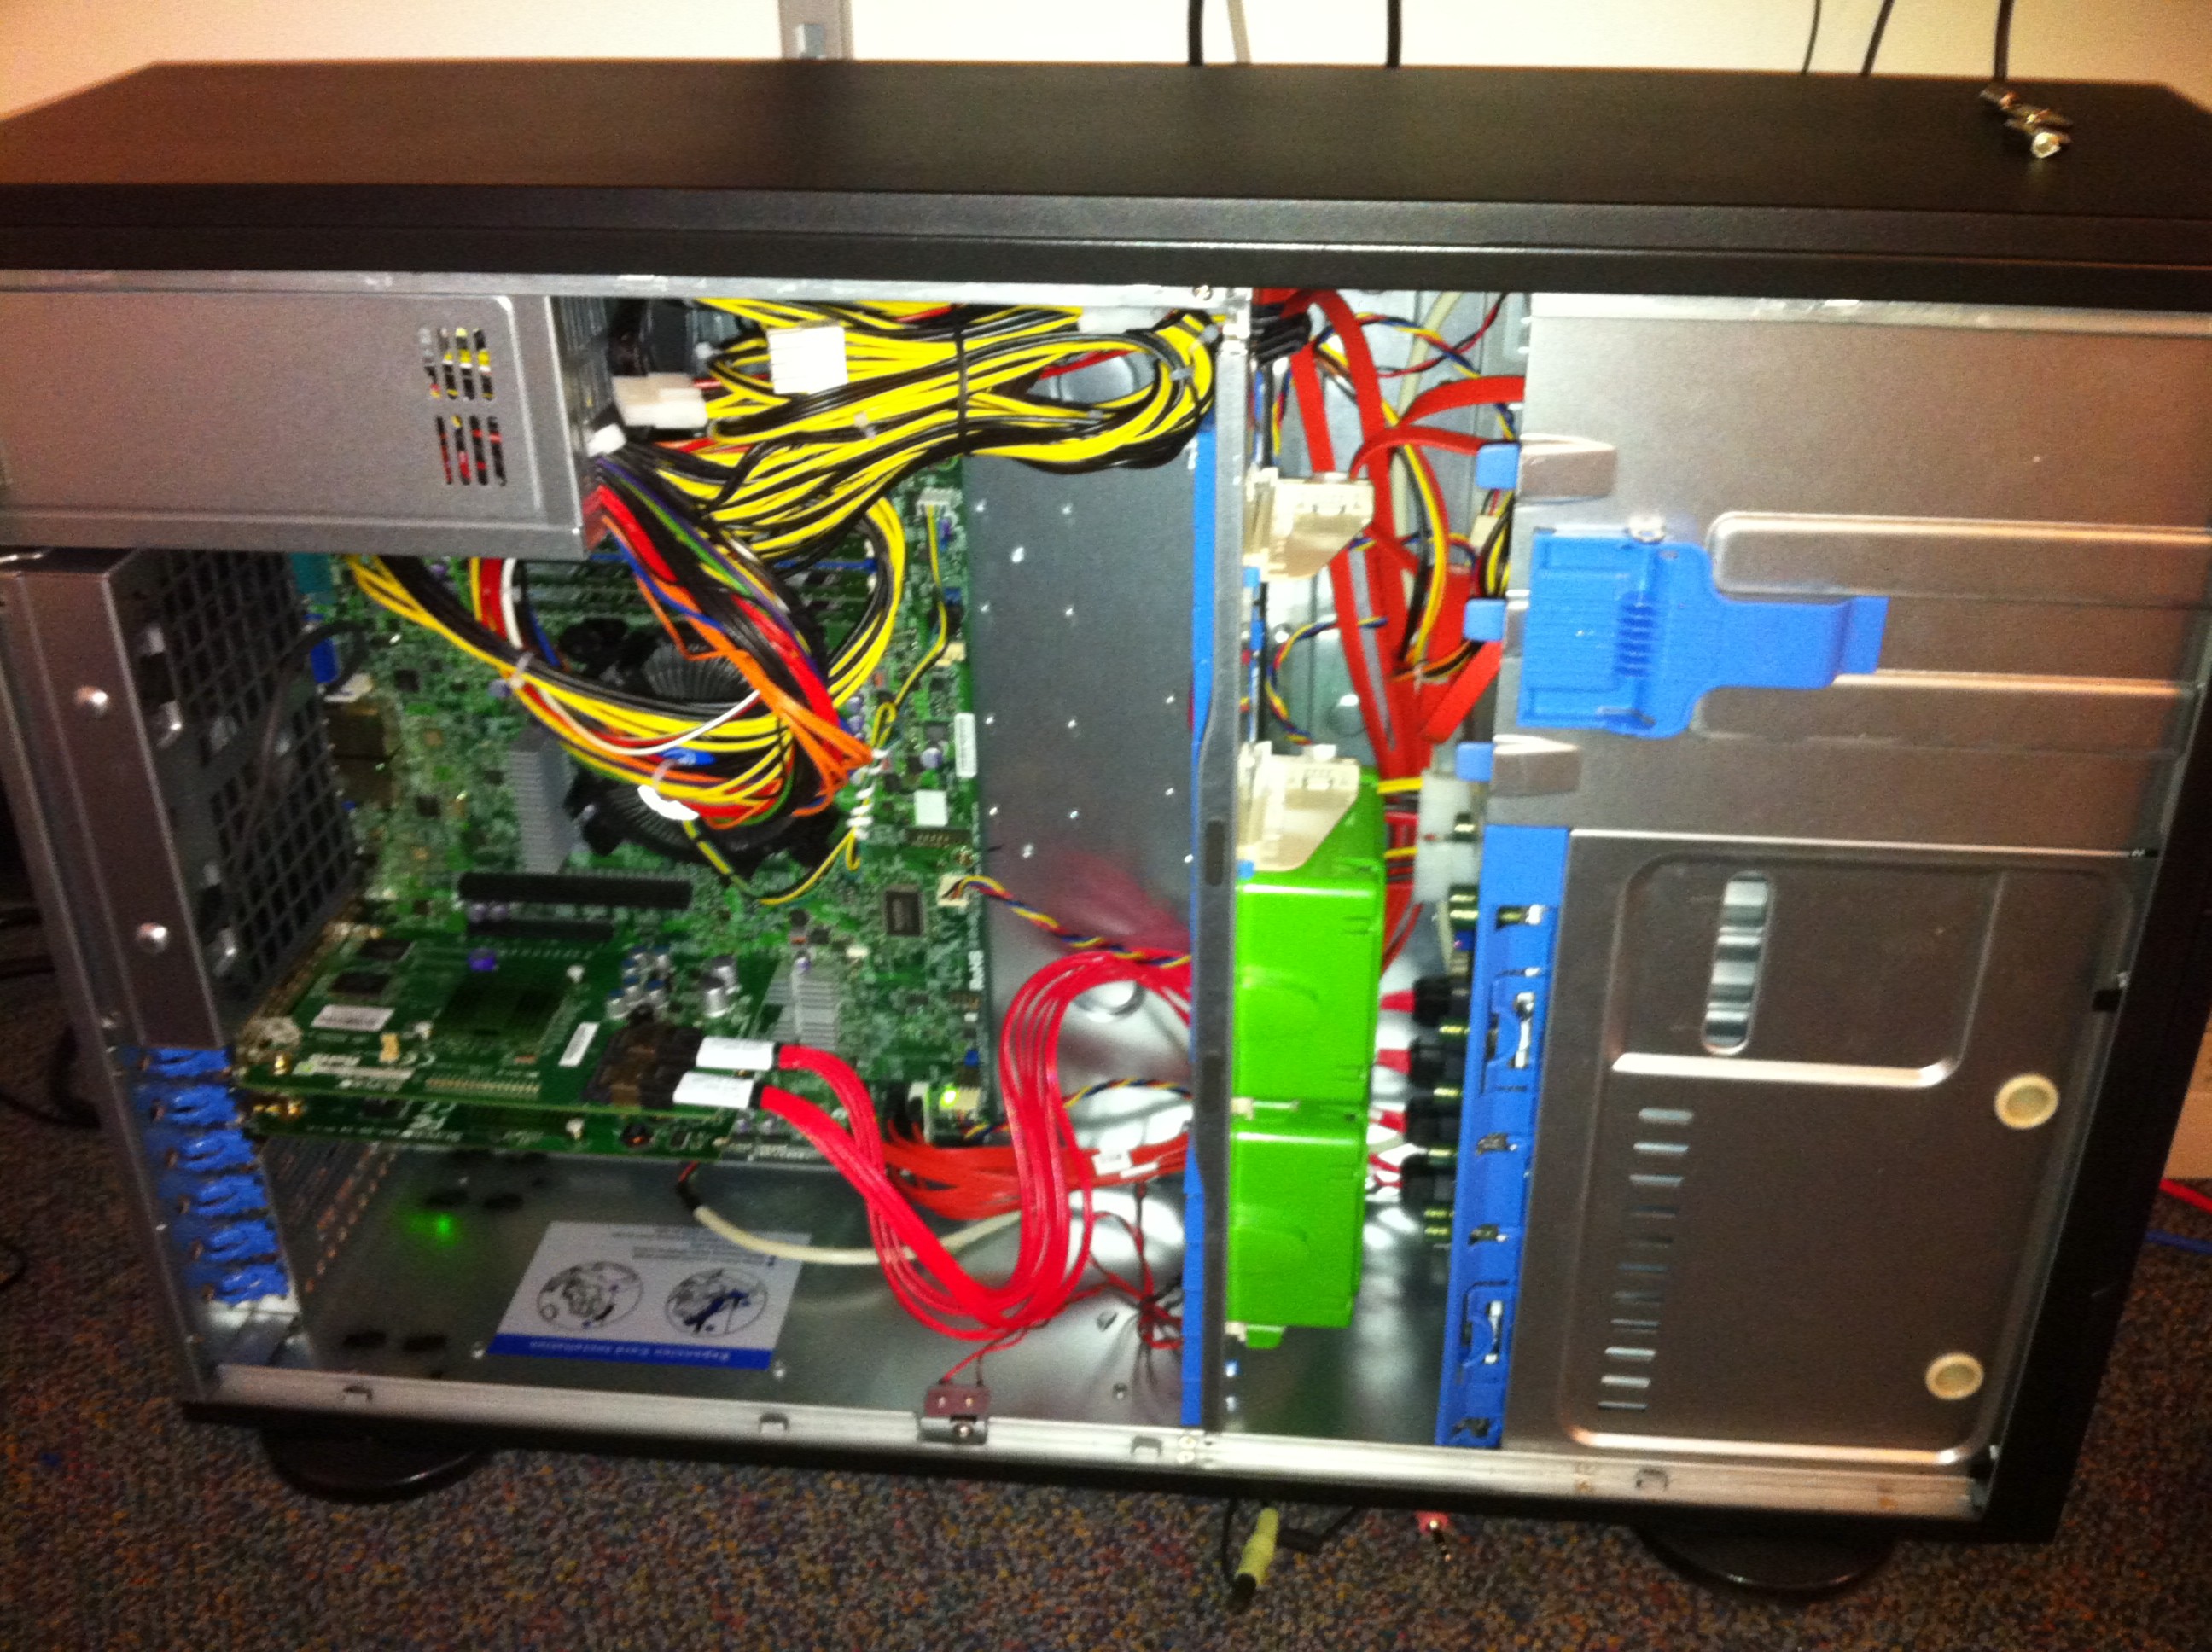
One of the first things I needed to do once the hypervisor itself was up & running was replace the storage server part missing from my previous all-in-one setups. This is a bit different because I don’t need to pass through anything… SmartOS is managing it’s own storage for it’s VMs/Zones & it’s faster too (obviously). I have another pool for data storage & backups, but I can’t use SmartOS’s global zone to manage it since it’s read only for the most part. So, I created a non-global zone for managing the storage pool itself, as well as to have a place to install the software I wanted such as Netatalk & Crashplan. For Netatalk, I compiled myself by loosely following this guide & Crashplan installed without a hitch using pkg.
The key was passing the tank zpool to the zone so it could be managed there. This is done easily with zonecfg
:
1 2 3 4 5 6 7 8 9 |
|
I didn’t use the LOFS method mentioned in the above Netatalk guide because I’m not familiar with it. zonecfg
is the way I’ve always done it & seems to work fine here.
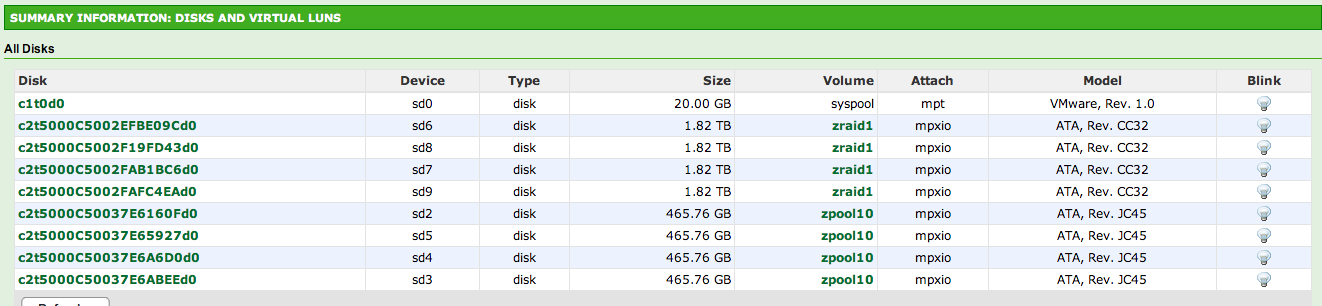
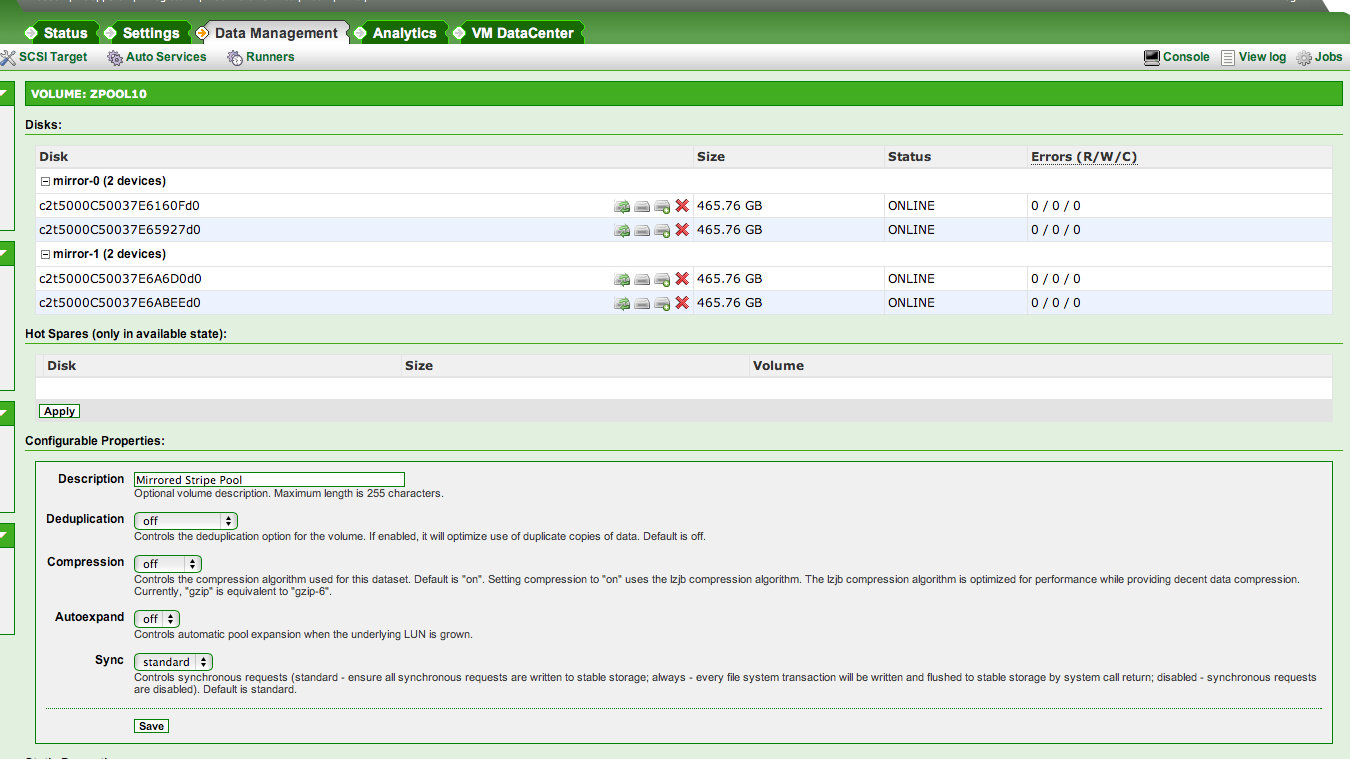
Just to be clear, here’s my storage pool layouts:
1 2 3 4 5 6 7 8 9 10 11 12 13 14 15 16 17 18 19 20 21 22 23 24 25 26 27 28 29 30 31 |
|
As mentioned earlier, there’s no GUI in SmartOS by default. Joyent sells SmartDatacenter & there’s also a 3rd party OSS tool called Project FiFo. FiFo is an excellent project, and I have it running in a zone. However, I find myself going back to the command line more for better flexibility. I don’t particularly like how FiFo handles networking, I don’t like how it measures utilization by what you’ve committed to the VMs/Zones rather than what’s actually being used, and each component has it’s own couchdb beam.smp
process that can eat up resources. I do like it’s graphing per VM/Zone as well as the browser based console to the VM/Zone itself, and the ease at which I can deploy an image. It also taught me that I can attach my ssh key to any VM/Zone for easier access, which is very cool.
FiFo does some decent monitoring, but I’m also using New Relic, which I was surprised to see supports SmartOS. You can get a free New Relic account that’ll retain data for 24 hours. Perfect for me:
There’s also DTrace which is supposedly the best stats tool ever, but I have no clue how to use it short of finding other people’s scripts such as Brendan Gregg’s (which look awesome) but even then most of the time I have very little idea what it’s telling me. Something I can improve on for sure.
This is one of the areas that requires extra work on your part. The nice thing about using a product like FreeNAS or NexentaStor is that automating things is easier via the built in management tools. If I want to automate something in SmartOS, I have to script it myself (at least from what I can tell). Though, I have dropped several hints to the FiFO guys that if they branch out to a ZFS Filer type project, they’d become very popular IMO.
One of these areas that you have to figure out is ZFS snapshots, but I found a great project on Github written in NodeJS called zsnapper & it works a treat.
Some useful links (in no particular order):
After using my VMware/NexentaStor All-In-One for a while, I grew tired of VMware’s bloat & limitations. Doing “cool stuff” in VMware requires a license, & vSphere Client only runs on Windows. I got tired of starting up a Windows VM just to manage my hypervisor. That’s the only thing I started Windows up for, and it got old. I wanted something I could manage directly from my primary OS, OS X, as well as lightweight & preferably open source.
There are plenty of hypervisor products on the market today, but I wanted to move to something open source & unix based. KVM has quickly become a big presense in this market, and for a good reason: it’s awesome. It’ll run on just about any hardware you have, and has even been ported to Solaris in the form of SmartOS.
Of the many great projects that use KVM, I chose Proxmox. Here’s a few of the many reasons why:
I also checked out oVirt & plain KVM/libvirt on CentOS. oVirt was a bit too bloated for my tastes. KVM/libvirt on CentOS wasn’t web based, but I almost went with them because I could have ran virt-manager via ssh X forwarding. I liked the Proxmox project a bit better.
My original plan was to stick with NexentaStor, but I ran into issues with that. KVM’s equivalent of vmxnet3 & vmscsi is called virtio. With KVM, if you want maximum performance, use virtio wherever possible. NexentaStor does not have virtio drivers, so I couldn’t set up a VM of NexentaStor unless I used IDE for storage & E1000 for net. I was willing to compromise with E1000 for net, but IDE for storage wasn’t gonna work for me.
My secondary plan didn’t really work out either. This plan was to use OmniOS & Napp-IT. OmniOS is based on a newer illumos kernel, and therefore, I was able to get virtio type disks working. That process was a bit daunting because the OmniOS installer doesn’t include the virtio drivers by default, so I had to install to an IDE disk, pull in the virtio drivers from the pkg repos, attach a virtio disk, add the new drive to the root pool, then remove the old one. It was cool to do, but kindof a PITA. However, it was for naught, because trying to do VT-d passthrough to the VM caused it to panic. Word on IRC in #omnios was it had something to do with the USB/PCI code in the kernel. Sigh, back to the drawing board.
The third option was FreeNAS. Let me preface this by saying I will always pick Solaris/Illumos based storage first in the datacenter. A port of ZFS will always be second choice for me. That said, the FreeNAS project is a very good one. They also recently picked up some major talent with Jordan Hubbard, ex-Apple CTO. FreeBSD is alive & well, & still a big player in the ZFS community.
Imagine my surprise when I found out that FreeNAS includes both disk & net virtio drivers by default. A quick install later, and I had my storage solution up & running.
I’m not going to cover the entire how-to beginning to end, because a lot of it is similar to VMware/ESXi. I will cover the major differences & how I worked around them.
The first obvious difference is VT-d PCI passthrough. VMware makes this easy to do. With Proxmox, it’s pretty easy too, just took me a while to figure out.
First, we need to prep Proxmox itself to use passthrough. The Proxmox Wiki explains how pretty well.
Second, we need to figure out the device ID to pass through. SSH into the proxmox node & become root. Then do:
1 2 |
|
Let’s say your FreeNAS VM is ID 100. With FreeNAS powered off, you’ll need to manually edit the config file to add the option hostpci0: 02:00.0
:
1 2 3 4 5 6 7 8 9 10 11 12 13 14 15 16 |
|
Once you’ve done that, restart Proxmox. Once it comes back up & FreeNAS has been started up, FreeNAS should be able to see the disks attached to that controller. If they already have ZFS datasets on them, you can just import them & you’re good to go.
When I first set up Proxmox/FreeNAS, Proxmox didn’t have OpenVSwitch integrated. As of now (v3.2), it does, though I haven’t played around with it yet. I plan to figure that out soon.
Proxmox uses Linux bridges for managing network interfaces. What I did was create a bridge called vmbr1 that was not attached to any physical NICs & gave it a private IP 172.16.1.1. From the FreeNAS side, I added a new virtio interface attached to vmbr1, and within FreeNAS, gave it IP 172.16.1.2.
Some pics to illustrate:
Proxmox Network Config:
FreeNAS VM Config:
Proxmox Storage View w/ NFS shares mounted:
FreeNAS Disk View:
FreeNAS is a great ZFS solution for home use. It’s rich GUI & extensible plugins make it a lot of fun to use. For example, it has a Crashplan plugin which now handles all my backups. I’ve not been able to distinguish any performance loss from my ESXi/NexentaStor setup. Homelab loads just aren’t very high. I’m also really enjoying Proxmox, and the Proxmox devs are doing a lot of great things with it right now. It’s a very active project.
I’m really happy with how this turned out.
]]>There are a million “Migrating from Wordpress to Octopress” blogs out there. I didn’t want to be yet another one, but I had a few thoughts I wanted to get out there. Most Octopress blogs I see out there are owned by developers, and I’m a sysadmin. I had been using Wordpress for a long time, & Blogger before that. Octopress is… different.
The key to successfully migrating from Wordpress to Octopress is to understand how they’re different.
Wordpress is a collection of php scripts you dump into a webserver root, install some dependencies, tweak some config files, & setup a database for it to use. Half of the setup is done through your web browser, & your Wordpress host does all the content generation work. You create a blog post in your browser most likely, & the content is stored in the database backend. When a page is requested, Wordpress’ php generates it from the database content (usually). This all happens on the server hosting Wordpress itself.
Octopress is mainly run on your computer. You set up the computer you’re using with some dependencies, download Octopress source code, change it a bit to be specific to your website, run commands to manage it & generate new posts, then upload static html files to your webserver root via rsync (usually). You’re actually generating the site’s content on your computer itself, then deploying it to your webserver via some copy method. All your webserver does is serve static html files. Cool, huh? :)
If you were hoping I’d describe how to do it, I defer you here: http://octopress.org/docs/. I’ve read through those docs many times, as well as other blogs, to gain a better understanding of how Octopress works & how to use it. Hopefully the two paragraphs above will help you get started quicker.
I migrated to Octopress in October of 2013 (coincidence). My thoughts of using it so far have been mostly positive. My VPS only has a measly 1 CPU & 512MB RAM. It was really struggling to work with the latest Wordpress & php-fpm, constantly running out of RAM & being very sluggish. Since migrating to Octopress… Holy Crap! My VPS now sits mainly at idle, barely using any resources. Pages load lightning quick & I have all the plugins I need to generate the kind of content I want.
I was also surprised at how much crap Wordpress injected into my blog posts when I was using it. Most of the work on my blog from October til now has been fixing the posts, & I’m still not done. I definitely appreciate Octopress’ clean markdown formatting. I’m writing this blog post in TextMate, which is a great editor for markdown. I’m still learning it’s syntax.
Some pointers:
“But… I wanted you to show me how to do it step by step!”.
No.
Read… the… docs. That’s the #1 most important step to using Octopress is understanding how it works.
]]>Crashplan is also the only backup solution I know of that is really cross-platform & allows free local backups. They support Windows, Mac, Linux, & Solaris, & state that FreeBSD support is coming. Can’t beat that. I will say though, this is not supported by Crashplan or NexentaStor. Installing it requires some workarounds because Nexenta uses apt as it’s underlying package management tool, whereas Crashplan is a pkg type installer. There are other ways to install it besides this one, but I like this one better because other ways I’ve read involve mixing the Crashplan Linux & Solaris installers. In reality, that may be just fine since Crashplan is mostly a java app, but still… I want 100% Solaris if I can get it. So this install is a two step process, & takes a little longer. It involves setting up an OpenIndiana VM, installing Crashplan to that, then copying the files over to NexentaStor. Simple enough, right? I’m assuming you have working OpenIndiana & NexentaStor instances & that you can ssh between each as root. To install Crashplan on OpenIndiana, it’s pretty straightforward:
pkg install jdk
cd /tmp && pkgadd -d .
1 2 3 4 5 6 7 8 9 10 11 12 13 14 15 16 17 18 19 20 21 22 23 24 25 26 27 28 29 30 31 32 33 34 35 36 37 38 39 40 41 42 43 44 45 46 47 48 49 50 51 52 53 54 55 56 57 58 59 60 61 62 63 64 65 66 67 68 69 70 71 72 73 74 75 76 77 78 79 80 81 82 83 84 85 86 87 88 89 90 91 92 93 94 95 96 97 98 99 100 101 102 103 104 105 106 107 108 109 110 111 112 113 114 115 116 117 118 119 120 121 122 123 124 125 126 127 128 129 130 131 |
|
Notice the last step details how to import Crashplan’s SMF manifest, so you can manage the service in true Solaris form. You don’t have to do that on OpenIndiana, but no harm in doing so at this point. Now we want to get all that stuff over to NexentaStor, so as root:
1
|
|
README VERY IMPORTANT: this assumes there is no /opt/sfw on your NexentaStor install already!! It’s a pretty safe bet as NexentaStor doesn’t install anything there, but please make sure yourself. Also replace “nexentastor” with the name of your NexentaStor server, or it’s IP. Enter the root password & it’ll do it’s thing. You should see each item it copies print out to the screen:
1 2 3 4 5 6 7 8 9 10 11 12 13 14 15 16 17 18 19 20 21 22 23 24 25 26 27 28 29 30 31 32 33 34 35 36 37 38 39 40 41 42 43 44 45 46 47 48 49 50 51 52 53 54 55 56 57 58 59 60 61 62 63 64 65 66 67 68 69 70 71 72 73 74 75 76 77 78 79 80 81 82 83 84 85 86 87 88 89 90 91 92 93 94 95 96 97 98 99 100 101 102 103 104 105 106 107 108 109 110 111 112 113 114 115 116 117 118 119 120 121 122 123 124 125 126 127 128 129 130 131 132 133 134 135 136 137 138 139 140 141 142 143 144 145 146 147 148 149 150 151 152 153 154 155 156 157 158 159 160 161 162 163 164 165 166 167 168 169 170 171 172 173 174 175 176 177 178 179 180 181 182 183 184 185 186 187 188 189 190 191 192 193 194 195 196 197 198 199 200 201 202 203 204 |
|
Make sure java is installed on NexentaStor:
1
|
|
Lastly, run the two commands the install script shows you on NexentaStor as root:
1 2 |
|
Keep in mind you have to be in a pure root bash shell, not NMC, to do this on NexentaStor. Now verify it’s running:
1 2 |
|
Good! All that’s left is to configure it. Crashplan has instructions on their site: Configure a Headless Client. The last step is to create a ZFS folder for Crashplan to store it’s backups in. This is easy enough in NexentaStor, just create a folder on the ZFS pool you want & set it up accordingly. I have mine set to use compression, but that’s it. Crashplan does deduplication & more compression itself, so I figure that’s plenty.
I vaguely recall having some problems getting Crashplan to see the /volumes directory where NexentaStor mounts it’s pools & folders. What I had to do was to disable Crashplan, go into /opt/sfw/crashplan/conf, & edit I think the my.service.xml file to include the location manually. My memory’s fuzzy on that, & I found the solution by Googling so I’d recommend doing that if you get stuck with the same problem. It’d be pretty cool to see NexentaStor create a plugin for Crashplan, where the installation would be as simple as a click & it would be managed by NMV. Wouldn’t take much, I don’t think. Maybe in v4. ;)
]]>First place I looked were on the iOS restrictions themselves. Unfortunately there’s no time limits there yet. It would be nice if Apple built something into iOS that locks the device between certain hours or after X amount of hours. I also looked for a way to limit the volume setting, because my son liked to turn it up full blast all the time. This doesn’t seem to be possible either, at least not universally across apps. I wound up putting a strip of scotch tape over the speaker, which works pretty well. The audio is still audible, but at a much more pleasant level.
Second place I looked were 3rd party apps. I found a few like TimeLock & KidTime, but none of them seem to have very solid reviews. I didn’t want to invest the time into getting them working if they weren’t going to work well.
Third place I looked was for ideas in limiting device usage on the network. I have a pfSense box doing all my firewall/routing stuff, so I figured surely there must be a way. There is, called Captive Portal, but it’s way more complicated than what I’d need.
What I finally wound up doing is going with something I kinda just stumbled upon. I also have an Apple Airport Extreme at home that serves as my primary wireless access point. I was browsing through it’s settings one day & stumbled upon a feature called Timed Access Control. It’s pretty easy to set up too. In Airport Utility, select your Airport Extreme, Edit, then click on the Network tab. You’ll see the option at the bottom:
Just check it & click the Timed Access Control button. A new window will come up where you’ll configure the individual devices. The “default” setting allows all devices, & you can’t get rid of it, but you can set wifi usage limits on all devices if you want to. What you’ll want to do is add another device by clicking “+”, then giving it a name:
The most important part is identifying the devices MAC address of the wireless device you’re trying to limit. There are several ways to do it, but probably the easiest is to pull it up on the iPad itself:
You can see in the above picture the limits are pretty flexible. I can set stricter limits during the weekdays, but loosen them up a little on the weekends. I can already tell I’m going to have fun with this stuff as they get older… setting parental controls & the like. They’ll probably call me evil computer dictator Dad. I’m OK with that. This setting has been working as expected, no network traffic on my wife’s iPad during certain hours. It doesn’t prevent them from using the iPad completely, but most of what he does involves network related stuff anyway (Netflix), so if that stops working, he usually loses interest. Win.
That said, this isn’t impossible to get around. Mac addresses can be easily spoofed. If my 3 year old figures out how to do that on this iPad, I’ll let him have it because he’s obviously wicked smart & doesn’t need me telling him what to do. :)
]]>One of the things I wanted to use all that disk space I have in my ZFS/ESXi All-In-One for is Time Machine Backups for the 3 Macs in my house. I use a combination of Time Machine & CrashPlan for my backups. Yes, I’m using CrashPlan on NexentaStor as well; that’s a future post.
The recent surge in popularity of the Mac OS has really helped the open source project Netatalk. Netatalk has been around a while, and it’s still going strong. The latest release, v3, looks to have been a big re-write in how Netatalk works. The biggest change I can see is that configuration is a lot easier & the CNID backends now go into a database rather than “hidden” folders on the shares themselves. Nice! Also, the feature we want that’s been present since a later version of 2, built-in Time Machine support.
The writeup I pulled from exists on NexentaStor’s wiki: http://www.nexentastor.org/wiki/site/AFP_with_TimeMachine. However, that’s for v2, but thankfully v3 is similar.
To start, we need to fall to a “raw” root shell in NexentaStor. I say “raw” because trying to become root on NexentaStor defaults to NMC (Nexenta Management Console), which is a command-line menu-driven shell designed by Nexenta to manage the main functionality of NexentaStor. So, to become root from NMC:
1 2 3 4 5 6 |
|
Now we need to install Netatalk’s prerequisites. Thankfully, they are all in the repositories so we don’t have to compile any of these from source (that can be a real pain). Let’s install them:
1
|
|
You may notice netatalk does exist in the repositories as well, but that version is pretty old. I’m not sure if it supports Time Machine or not. Anyway, we want v3, so we’ll download the source, extract it, and install it:
1 2 3 4 5 |
|
How we configure the source is the key to getting it working well on NexentaStor, as well as setting things how you like it. “./configure –help” will show you all the available options. Here’s what I did:
1
|
|
I think the most important option in this case is “–with-init-style=solaris”, because this will register Netatalk with SMF so we can use it to start/stop it true Solaris style. The important thing here is you don’t want any errors when configure finishes. The last output of configure should be a summary of your options you configured with (including Netatalk’s defaults). If it errors, it’s most likely a missing dependency but we got them all so it shouldn’t fail. The rest is pretty straightforward, typical make install:
1
|
|
In case you aren’t familiar, “make” compiles the code how it’s specified by “configure” and “make install” puts it all in place & takes care of post-configuration. The main binary of Netatalk is afpd, so let’s check it out:
1 2 3 4 5 6 7 8 9 10 11 12 13 14 15 16 17 18 19 20 |
|
Now we need to define some shares to serve out over AFP. I will admit the documentation on Netatalk’s website is a little sparse as to what’s available. ”man afp.conf” contains everything you need to know, but the options available can be a little overwhelming to someone not familiar with AFP. Here’s my configuration to give a working example:
1 2 3 4 5 6 7 8 9 10 11 12 13 14 15 16 17 18 19 20 21 |
|
The value “time machine = yes” enables the Time Machine destination option for that share. You can see I’ve created separate ZFS “folders” on the ZFS pool tank. So my method is to create a ZFS filesystem (folder) if I need a new share, then add it to afp.conf.
Now we turn it on:
1 2 3 4 |
|
Netatalk, based on how we’ve compiled it, will use the local unix user authentication on the system, and it will grant access to shares based on the ACL of the share. In the NexentaStor web GUI (NMV), make sure your created user has the “unix” option selected. You will also need to make sure that user or users have access to the ZFS folder by setting the ACL. You can do this either via the web GUI or command line.
So with Netatalk running, your unix user account created, & permissions set on the ZFS filesystem, you should be able to connect to the Time Machine share then point Time Machine to it to start your backups.
The nice thing about this is we’re storing Time Machine backups on ZFS. When doing Time Machine over the network, it creates SparseBundles on the Time Machine volume. This allows Time Machine to retain all of the important “extra” HFS+ data, regardless of the filesystem it’s on. So the fact that it’s being stored on ZFS doesn’t hurt anything as far as losing important OS X specific data that’s tied into the filesystem itself. We also get some additional benefits from using ZFS:
I haven’t fully tested a restore yet using Netatalk v3, but I have using the older v2 setups in the past. I should boot to the recovery HD & see if it’ll see the Time Machine volume on it’s own. It may need to be mounted manually via command line to be recognized properly. I have successfully restored via Netatalk v2 in the past, but I had to mount the Time Machine share manually. Check out “man mount_afp” or Google for this.
I’m only using Time Machine for a “bare metal” type restore situation, in case I need to restore the OS itself. The reason for this being I don’t believe Time Machine is well suited for backing up lots of data. I use CrashPlan+ to handle my big data backups, which I’m also running on NexentaStor. That’ll be the topic of my next blog post.
]]>To (finally) follow up on my original post, ZFS/ESXi All-In-One, Part 1, this post will go over how to configure ESXi & NexentaStor to work with each other, all from within one physical server. Typically, ESXi will connect to a physically separate server or appliance that provides storage. For production environments, this is preferred. For testing/development, it can be prohibitively expensive. The All-In-One solution provides a good alternative.
First thing we need to do is get NexentaStor installed in a VM. For obvious reasons, this VM needs to be on local attached storage available to ESXi. In my previous post, you noticed I had some SSD’s in the box. The SSD’s are attached to the motherboard’s SATA controller ports. One SSD contains ESXi itself, & I dedicated another one of the SSD’s for hosting NexentaStor’s VM. These can be set up in the vSphere Client’s configuration screen:
You basically just format the SSD with VMware’s VMFS, then install NexentaStor’s VMDK into that volume. When I set up my NexentaStor VM, I allocated 2 CPU cores & 8GB RAM. You can get away with one core, but you want to give NexentaStor as much RAM as you can. Also one of the nice things about NexentaStor is that Nexenta has included their own compiled vmxnet3 driver in NexentaStors repos. I think they also have open-vm-tools, but I still use VMwares. I install VMware’s tools first, then attach/create the vmxnet3 NIC & install the vmxnet3 driver. When you set up the VM, you may have to use a temporary E1000 NIC to get basic network configuration so you can get NexentaStor set up, then add the better vmxnet3 NICs later. Here’s a good how-to about installing the tools on NexentaStor, and also a workaround for a problem you’ll run into regarding running vmware-config-tools.pl
.
Once NexentaStor is set up, we have to configure it to see the local drives in the server. These drives are attached to the SAS/SATA JBOD controller we bought. It was important to pick the right disk controller because we need to be able to pass it through to the VM directly. This is called VT-d passthrough, a feature ESXi has that allows allocating hardware (usually PCI devices) directly to a VM itself. Usually all hardware passed to a VM is virtualized by ESXi, but in this case, NexentaStor needs direct access to the drives themselves to work it’s ZFS magic. So, in the same ESXi Configuration panel, passthrough can be configured in the “Advanced” section:
What this does is marks it as available for passthrough to a VM. ESXi will no longer be able to use that device itself. You will have to reboot ESXi after configuring passthrough. Once it has been rebooted, we need to assign the card to the NexentaStor VM. To do that, go to the NexentaStor VM’s configuration window:
What you will need to do is click “Add:”, & you should see the model storage adapter itself. Click OK to add it to the VM, then start NexentaStor up. Once it comes up, you should see whatever drives are plugged into the adapter:
Notice the first one on the list is the VMDK, but the rest show up as physical drives. This is what we want. In my case, I have 4x500GB drives & 4x2TB drives. Yeah it’s a lot for a home lab, but I’m using NexentaStor for more than just SAN storage for ESXi. I’m also using it for data storage via SMB/AFP/NFS/Crashplan, but that’s another post coming soon.
When configuring storage for ESXi, You want as much performance as you can get. A good, cheap way to get performance with ZFS is using striped mirrors, or RAID10. This can be done on the NexentaStor Data Management panel. The end result should look like this:
One of the nice features I’d like to be able to test in this setup is deduplication, because VM’s dedupe very well. However, dedupe is very RAM hungry & this setup just doesn’t have the resources for it. Hopefully I’ll upgrade the server to 32GB RAM soon then maybe try out dedupe. There are still other nice features for hosting on ZFS datastores, such as snapshots.
Now that we have the volume created, we need to put a ZFS filesystem on it & share it out to ESXi. NexentaStor calls ZFS filesystems “Folders”. I created a folder called “VMware” & shared it out via NFS:
I haven’t done any tweaking in the ZFS properties. I also made the folder read/write to everyone/anonymous, but I’m only exporting it to the single ESXi host itself. If that doesn’t make sense, google “exporting NFS filesystems” for a primer.
Now we need to get the exported storage visible to ESXi. To do this, we create a virtual switch in ESXi. In your ESXi host’s Configuration panel, click Networking, Add Networking. Then select these options:
What this will do is allow direct TCP/IP communication between NexentaStor & ESXi itself. The cool thing is the switch is virtual, & is only limited by the hardware you’re running on. I’m not sure what limitations on virtualized switches are & how the correlate to what CPU/RAM is available for ESXi itself, but I haven’t noticed any performance issues at all & the endpoints are full 10Gbe, thanks to vmxnet3. :)
So the last part is we need to create the NIC for NexentaStor that will use this virtual switch, so NexentaStor can provide the storage to ESXi via NFS. Make sure you connect the NIC to the virtual switch, whatever you named it. Mine is named “Private Network”:
Once that’s done, set a manual IP address via NexentaStor:
The IP can be anything you want in the subnet range of the switch 172.16.0.2-255, I just chose 172.16.0.100 for no reason.
Now, everything is configured as it should be from an operational standpoint. We can go to the ESXi host’s configuration panel & add the NFS storage:
End product should look like that. I also have a separate ZFS filesystem for hosting ISO’s, just in case you were wondering. Now you can test this out by creating a new VM & putting it on the newly available datastore. Mine’s very fast, Win2k8R2 server takes 2 seconds to boot up. Latency spikes are 13ms at max, & averaging ~3ms. Not bad. :)
The last thing you might want to think about is making the NFS storage available right after ESXi boot. You don’t have to do this, but you’ll have to start NexentaStor manually each time ESXi is rebooted if you don’t before you can start the rest of the VM’s. I recommend doing it.
To do this, again in the ESXi host’s Configuration panel, under Software, check out Virtual Machine Startup/Shutdown. You can set the NexentaStor VM to automatically start up after ESXi has booted. As far as the delays go, I leave mine as the default 30 seconds. The tricky part is if you want to auto-start VM’s that reside on the NFS datastore; getting that timing right can be a challenge. I don’t have any advice there; just trial & error.
I’ve been using this setup over a year & it has not caused me any problems (knock-on-wood). That said, I’m writing this post mostly from memory. I may have left a detail or two out of the setup, so if I did, please let me know in the comments. I’ve had as many as 10 VM’s running simultaneously with zero throughput problems, but that’s mainly b/c they have little to no load. This setup is great for trying stuff out. My hope would be one day having another ESXi host & a vCenter license to do more fun things like vMotion. One can dream :)
]]>I use NexentaStor at home for my ZFS/EXSi All-In-One. I have a few NexentaStor auto-services set to do ZFS snapshots on each of the filesystems. I take hourly snapshots kept for a day, daily snapshots that are kept for a week, and weekly snapshots that are kept for a month. I’ve been having a problem with some of the snapshots not getting expired. Since I’m using the community edition, I can’t really complain. I should probably file a bug, but I know the team is busy working on v4.0, which will be awesome. The admin GUI doesn’t have a way that I can see to remove them, so I delved into the command line.
First, you need a list of all the snapshots on the system:
# zfs list -t snapshot NAME USED AVAIL REFER MOUNTPOINT syspool/rootfs-nmu-030@initial 937M - 1.47G syspool/rootfs-nmu-030@nmu-024 204M - 1.90G syspool/rootfs-nmu-030@nmu-025 183M - 1.98G syspool/rootfs-nmu-030@nmu-026 217M - 2.00G syspool/rootfs-nmu-030@nmu-027 421M - 2.01G syspool/rootfs-nmu-030@nmu-028 218M - 2.02G syspool/rootfs-nmu-030@nmu-029 337M - 2.14G syspool/rootfs-nmu-030@nmu-030 398M - 2.10G zpool10@snap-weekly-1-2012-09-08-030002 18K - 33K zpool10@snap-weekly-1-2012-09-15-030003 0 - 33K zpool10@snap-weekly-1-2012-09-22-030019 0 - 33K zpool10@snap-weekly-1-2012-09-29-030010 0 - 33K zpool10@snap-daily-1-2012-10-02-030003 0 - 33K zpool10@snap-daily-1-2012-10-03-030008 0 - 33K zpool10@snap-daily-1-2012-10-04-030006 0 - 33K zpool10@snap-daily-1-2012-10-05-030025 0 - 33K zpool10@snap-weekly-1-2012-10-06-030002
Now copy the names of the snapshots you want to remove & put them in a text file (mine was zfs_cleanup.txt) like this:
zpool10@snap-weekly-1-2012-09-08-030002 zpool10@snap-weekly-1-2012-09-15-030003 zpool10@snap-weekly-1-2012-09-22-030019 zpool10@snap-weekly-1-2012-09-29-030010
Now you can run a short for loop against the file to remove the snapshots:
#!/bin/bash file="zfs_cleanup.txt" while IFS= read -r line do # display $line or do somthing with $line echo "Deleting snapshot $line" zfs destroy $line done <"$file"
If you just have a few snapshots to remove, that’s kinda overkill, but I had ~50. Saved me a bit of time. :)
]]>You can use *ANY* linux livecd you want, as long as it includes the appropriate graphics card drivers for your model Mac. I tried several & wound up using PCLinuxOS. The reason you need the graphics drivers is because you need to be able to suspend the Mac to RAM & wake it back up reliably. In my experience, this is only easily done if the graphics drivers are installed & I’m not aware of a way to “install” them in a LiveCD while it’s running. If you can’t get the graphics driver loaded, none of this will work.
I’m not going to repeat all of the instructions for doing the secure erase, as they’re very well documented in the SSD ATA Secure Erase Wiki. I will go over the process it took me to suspend & wake up my 2008 Macbook Pro, effectively “thawing” out the SSD from it’s frozen state that hdparm reports it to be in.
This assumes you’ve burnt your LiveCD already & it is in your Mac’s optical drive. Restart your Mac & hold down option to bring up the available boot items screen. Wait a minute for the optical drive to spin up & you’ll see a disc come up humorously labeled “Windows”. Hit enter & PCLinuxOS will start booting up. This can take a while. Once you’re up & running, you need to suspend to RAM (click Start, Suspend). The suspend works great, thanks to the right graphics driver being loaded. There’s a slight glitch resuming, though. When you resume, the screensaver is going to ask you for a password & I don’t know what it is. There are two ways to handle this:
Once you’ve verified the drive is no longer frozen as the tutorial above states, you can then proceed to secure erase the drive. I successfully did this on my 2009 model unibody Macbook Pro with NVIDIA GPU’s. I suspect those with ATI *might* have more trouble due to the bad ATI driver support on Linux.
I’ve also found this tutorial after I used this method, which looks like it’s a lot easier, but I have not tried it.
]]>Easy, like most things in life, is a relative term. Relativity is one of those topics that often fascinates me, because I find that it helps me put my life into perspective, as well as understand where others are coming from or are going. People get so wrapped up in their own lives that they forget their life situation doesn’t necessarily apply to others. Your life at the moment might be hard, while someone elses might be easy at that particular time. Next thing you know, the tables are turned. Life is funny that way, which I’m sure we all know at least that. I find, however, that many people don’t tend to look at their life from a relative point of view. If I have a conversation with someone about a related topic, I’ll usually make an effort to bring relativity into the discussion. Not so surprisingly, the response I usually get is “I hadn’t thought about it that way”.
Ok, ok, I’ll get to the point. I think what we often fail to do is to take a second & step back from it all & really appreciate how far you’ve come & what you’ve accomplished. It’s especially easy to forget to do these days with our fast paced society. We accomplish one thing & immediately move on to the next. Any feelings of gratification from the accomplishment seem so short lived, if they exist at all. Being in the IT industry, this is especially easy for me. It seems like by the time I master something, it’s being replaced by something newer. I don’t have TIME to appreciate my accomplishments! Thankfully, I’m aware of this so I have somehow made it a subconscious effort to occasionally remind myself to stop & smell the roses. One of my favorite thoughts is to think back to when I was a teenager just then learning how Windows works, then I quickly fast forward & compare to what I’ve learned since then. The differences never cease to amaze me. You should try it sometime, if you haven’t already.
]]>First off, open up Disk Utility, which is in Applications, Utilities. Before we do anything, we want to check the disk’s filesystem consistency to make sure it’s clean. Select the actual disk or the volume on the disk & click “Verify Disk”:
If it comes back clean, you’re good to go. If not, try “Repair Disk” & repeat until it comes back clean. If it takes more than a few times, something else might be awry & I recommend you get the disk checked out.
Once we know our disk’s filesystem is clean, we can now resize the partition however we want. Make sure you have the right disk selected & click on the “Partition” tab:
You can see this disk does only have one partition that encompasses the entire disk, and it does have some data on it (indicated by the blue shadowed area). What usually escapes most people’s attention is the little arrow at the bottom right of the disk space indicator. You can drag this to resize the volume as you please, but of course, you can’t make it smaller than the amount of data that’s on it. You also want to leave some breathing room on the disk, as filesystems need breathing room to perform optimally. So, knowing that, we can drag the arrow to resize the partition how we want:
Once we’ve done that, you can now add additional partitions:
If you want to add more, just resize the second and add a third. Once you’re happy with how it’s set up, make sure there are no files or processes accessing the disk & click Apply. Disk Utility will unmount the disk & work it’s magic & the new volumes will re-appear shortly after.
While I have never lost data from this process, you should always make sure you have a viable backup before doing anything like this to your disk. It’s also worth noting that you cannot resize a regular HFS filesystem, it must be HFS+. However, HFS+ has been the default OS X filesystem since 10.4 (Tiger), so chances are you’re using it.
See? Easy.
]]>Any IT admin worth his/her salt knows that virtualization is the big thing in IT right now & has been for a few years at least. It allows you to do things you wouldn’t be able to do on bare metal servers, such as move a server OS from one server to another while it is running (called vMotion). Love them or hate them, VMware is the king of virtualization in the datacenter. Luckily for guys like me (broke), they make a bare-metal hypervisor called VMware vSphere (formerly ESXi) available to use for free.
A hypervisor is basically software that provides hardware emulation. Some of you may have experience running VMware Fusion (OS X), Workstation, Server, or Player (Windows). These are called type 2 hypervisors, meaning they run a hypervisor on top of an operating system. This is a great way to get started with virtual machines or just to get those few Windows programs running on your Mac, but it is not by any means an efficient way to run a virtual machine. That’s where bare metal hypervisors, or Type 1 hypervisors, come in. They’re the only “physical” OS installed on that computer/workstation/server, and they have very little overhead on the actual hardware itself. That means more direct resources available for “guest” VM’s, so performance will be better.
After about 3 years of trying to patch together decent ESXi/NAS/SAN systems for testing/development purposes, I finally broke down & asked my boss to build a workstation. When it was approved (imagine my shock), I immediately started looking for options available. Some invaluable resources for doing research on this kind of expenditure:
During my research, my primary decision was trying to figure out if I wanted to buy off the shelf or build my own. Of course, being the geek I am, I gravitated more towards building my own, but I couldn’t ignore all the forum posts of people who bought hardware that didn’t work due to some minor incompatibility. I definitely didn’t want that (especially since it’s so hard to return things where I work), but I also couldn’t ignore that by building one, I’d get a lot more for my $$. I decided to build, & quickly came up with a list of must-have features:
So I knew what I wanted, now I had to do a lot of research. I had to make sure the parts I picked would work with ESXi & some Solaris distribution that would provide the storage for ESXi. I also had to keep this all just under budget. Keep in mind this will all be within one physical computer. :) I will say that building a list is the worst part. You antagonize over the little details, then you tweak the config endlessly trying to squeeze every last bit of power out of your budget. Several times I was tempted to just buy a system known to work & settle for less, but I soldiered on. I’m glad I did, because I know I got more for my $$. Without further ado, here’s my parts list:
You can see I went with a lot of Supermicro brand hardware. This is an easy way to reduce the risk that your components won’t be compatible, because most of Supermicro’s stuff is based on Intel brand hardware, & that’s almost always a sure thing when it comes to VMware compatibility. That said, you should still double check. I’m happy to say my research paid off; all of this hardware is working as it should. Here’s a shot of everything put togther:
Like I said, everything works, at least from a software perspective. If you look closer at the list, there is one major “gotcha”: the PCI cards are Supermicro’s UIO type card, which is a specific layout designed to work only in some of Supermicro’s rackmount server chassis. These cards are “flipped upside down”, to where the mounting bracket doesn’t line up height-wise with where the PCI slots are on the motherboard. The PCI-E x8 bus itself is exactly the same, so the card does work if you ignore the mounting problem. There’s really no way to make the card fit into an incompatible case without making some modifications to either the card, the case, or both. Considering a comparable Intel 4 port Network card was $350 more, I bought the Supermicro card with the plan to modify where needed.
The modifications I needed to make were not nearly as bad as I thought. I was even willing to jury rig the cards in place using duct tape. This method is a lot more stable, although it does require drilling & cutting. To get the UIO cards to fit in a standard case, I had to make the following modifications to the card bracket & case itself:
Here’s a picture of behind the case with both cards installed:
While it’s not quite as much support as a regular bracket would give due to clipping the tapered end off of the bracket, it’s still good enough in my opinion. As long as you don’t put any unnecessary strain on the card (don’t pull on the network cables), it should be fine. Needless to say, doing this voids some of your warranties, so make sure it’s worth it to you. This is a development/testing workstation for me, so the added benefit from a technological perspective outweighs the “build it right” factor. In a production system, I would never do this. I also wanted to add that if I ever do need to put a standard PCI-e card in either one of these slots, it will still fit.
The Supermicro parts are top notch, I would definitely recommend them. You’ll pay a little more up front, but you get a lot more in return.
Another big plus was I didn’t have any DOA parts; that was something I was slightly fearing from ordering everything a-la-carte. Apparently that does happen to some people. I’ve never had it happen to me (knock on wood).
So that covers the parts, build, & case modifications. I got all of this for under $3k, which is not bad considering I now have both a hypervisor & filer to play… er, test with. You could probably do it cheaper if you cut out the SSD’s & substituted the Supermicro case for something smaller. I was eyeing a Fractal Design case, but decided to pay a little more for the better PSU and hot-swap drive bays in the Supermicro case.
The next blog post, I’ll cover how I configured VMware vSphere 4.1 & NexentaStor 3.0.5 to actually provide the ZFS NFS datastore for ESXi’s VM’s. Most of it is already on the Napp-IT page as well.
]]>Google considers their cloud to be entirely hosted via web browser based technologies. The Chrome Netbook is basically a glorified full-screen Chrome browser built on top of a very lightweight Linux system. You can’t do much with it if you don’t have a network connection. All of your data is stored on Google’s servers, not the device you’re using. While this does have some convenience (you shouldn’t have to worry about data loss), your data is not really in your control. If Google’s servers go down, you can’t get your data. Granted, that does not happen often. I do seem to remember reading about a few Google accounts being accidentally disabled/deleted a while back. Things like this that involves not having the data in your control will always sit in the back of your head, while you conjure up all those “what-if” scenarios.
Apple’s version of the cloud is better. I might be biased, but I don’t think I am. If I am, I’m still right. iCloud revolves around sync. I’d like to take a moment to point out that I saw that coming. :) There’s a reason why Dropbox is so successful: because they do sync right. If people have 3 computers, they can have their data on all 3, all the time, always synced up. Apple apparently saw the response to Dropbox & designed iCloud around that idea. People don’t want all their data on just the cloud or just this computer or just that computer. They want it on ALL of their devices, ALL the time. And why not? Storage is cheap & getting cheaper; networks are getting faster. It’s becoming feasible to actually have your data everywhere, whereas in the past it was not.
Google’s cloud seems to be based around a limitation that is quickly fading. The requirement for having your data in one central location & using devices to view that data at that location is built around the idea that storage is limited, networks are limited, and sync is too complex to figure out. I guess if you think about it, sync probably is too complex for others to figure out… too many devices on too many platforms & they all want to work their own way. While a lot of people criticize Apple for being too controlling or limited, having that kind of ecosystem enables them to design a cloud like this, because they can predict how these devices will interact with one another a lot more… well… predictably.
Another point that’s probably more particular to me, but I think is a good one to make anyway, is security. I gave up on trying to remember a handful of complex passwords for websites & services I use about a year ago. I made the jump to using 1Password & haven’t looked back. I have a extremely complex & random password for each site I visit, and each one is unique. I have no idea what any of my passwords are, and I’m fine with that. 1Password stores them for me. I can’t use any of my services without it, and I’m a lot safer for it. So because of this, Google’s idea of of having access to all of my services on any device doesn’t appeal to me. I honestly think it shouldn’t appeal to anyone. I have access to all of my services on my devices, and that’s it. If I don’t have one of my devices on me, it’s probably for a reason & I wouldn’t need to check those things anyway. It’s definitely a minor sacrifice I’m willing to make to be that much safer. Even with this rash of site hacking, I’m not worried at all. If one of the sites happens to be one I use, I just generate a new, random, really long & complex password for the site & all of my devices get updated with it. Problem solved. I couldn’t do this on some random device I’ve never touched before.
So what about Amazon and Microsoft’s offerings? The Amazon problem is complicated. I don’t quite understand it very well from a consumer standpoint. I think their problem is lack of hardware integration, and their cloud offerings are attractive price wise, but limited and missing some features. Microsoft simply lacks innovation. They’ll copy other ideas a year or so after someone else has done it. Problem is, by then, people are already using that other service & have no desire to switch over. All users really want from Microsoft is Windows & Office.
Google’s cloud doesn’t work for me, nor does it appeal to me. Web apps have come a long way, but they’ll always be second to native apps. By focusing on sync, Apple’s found a winner with iCloud.
*EDIT*
The timing is uncanny: http://www.nytimes.com/2011/06/16/technology/personaltech/16pogue.html
]]>The camera arrived yesterday & I spent about 2 hours setting it up. More on why it took so long later. I was immediately impressed with the ease of setup, but of course I did it my own way rather than following the instructions. I knew it’d have a web based management interface, so I powered it on & plugged it into a wired ethernet connection, then checked my router’s interface to see which new IP address showed up on the network. I think the camera comes with software that installs a “camera finder” type of IP scanner on your PC, and I know that would be useful to the non-technical crowd.
Foscam is a company based out of China, so like with most things “Made in China” (it seems), there was a certain feel of cheapness to it, both with the physical construction & the web based management interface. The plastic of the camera is the kind you’d expect to see on a cheap child’s toy; it doesn’t feel durable at all. I bet it wouldn’t survive a 2ft fall onto a hard floor. Considering I have it on a 4 ft dresser, if my son takes interest & decides to pull it down to play with, I think we’re out of a camera. Now, if you’re thinking “Wait a minute, how’s a 1.5 year old toddler going to reach up on a 4ft dresser?”; he’s already learned he can stand on something sturdy to reach higher. :) I’m so proud! The web interface itself is definitely not the best I’ve seen, but it gets the job done. You can view the camera feed directly from your browser:
What I like best about the browser feed is it doesn’t seem to require Java or Flash. I did a quick look at the source & it’s calling some CGI script, & I’m not sure exactly what the CGI script is doing yet, but it works reliably so far.
The Foscam cameras are apparently easy to write apps for, because there are several apps for the iPhone/iPad available. A quick search on the Android Marketplace shows quite a few there too. My philosophy when looking for apps is if there’s more than one, try the free one first until you want a feature only available in one for sale. So, I downloaded CamViewer for Foscam Webcams, which is free. It has both portrait & landscape modes to view the camera feed. It’s a nice app for something that’s free. It can control the direction the camera points & has basic controls for adjusting the picture. Nothing fancy, it just shows you the feed, controls the camera, & it works well.
The only downside about this camera is that I had to lower the complexity of my WPA2 AES wireless key in order for the camera to be able to join the network. A direct quote from the User Guide FAQ section:
Normally, camera can’t connect wireless mainly because of wrong settings.
Make sure broadcast your SSID; use the same encryption for router and camera. Share key should not contain special characters, only word and number will be better. Don’t enable MAC address filter.
Previously, my key contained plenty of special characters, as that’s more secure. As to whether or not the security matched the application, I’ll admit my previous key was overkill, but I’m sure most security professionals would say there’s no such thing as overkill. That said, I’m sure I could have found a different camera that was more expensive, but I was willing to sacrifice a little security to save money. Plus, I couldn’t really find any other camera that offered all the features as this one did, specifically iPhone/iPad support. I’m sure there are others, but they are most likely out of my price range. So, even though my key is a little less secure now, I doubt I’ll have any intruders anytime soon. Since I run DD-WRT, I might look into seeing if I can get a notification when a “new” wireless device pops up on my network. Anyway, the key is the reason why it took me 2 hours. If it hadn’t been for that, it would have taken ~30 mins I’m sure.
There are other features built into the camera I haven’t explored yet, such as motion detection. I think if the motion detector is triggered, you can set it up to where it sends a series of screen captures to email or an FTP server if you have one set up. If you were setting one up to monitor the house, that’d be a nice feature to have. You also have the capability of setting up a dynamic DNS service, so if you open the necessary ports in your router’s firewall, you could connect from anywhere. I probably won’t do that because I don’t want the possibility of some stranger looking in.
I wouldn’t say this could be an all-in-one baby monitoring solution. For example, there’s no notification or audio alert if something is happening. The iPhone app I’m using doesn’t transmit audio. However, we already have an existing monitor in place that provides audio/vibration alerts so this is meant to compliment that. If we were starting from scratch, I’m not sure if we would have made different choices or not, as in whether or not we would have bought an all-in-one solution or something separate. Now that I think about it, I think it’d be more useful to have a separate smaller audio/vibration monitor for when you just need a notification rather than having to carry a video screen around with you all the time. So in a lot of ways, this setup is ideal for the flexibility it provides.
Overall, I’m happy with the purchase. For $100, I have an IP camera that I can access from any computer or iPhone/iPad in my house. That’s a good deal if you ask me.
]]>Don’t get me wrong, power outages can be very harmful to your computer, especially the hard drives. A computer *needs* to go through the proper shutdown sequence in order to prevent harming the computer components & to preserve your hard drive’s integrity. I know some people who get impatient & just hold the power button down to force a power-off. This is awful practice, is no different than a power outage, & should only be used as a last resort. And yes, I’ve told many people that. So a UPS obviously provides the benefit of keeping a computer powered on for a limited time if the power goes out. If the battery reserve of the UPS runs too low before the power comes back on, the UPS can tell the computer to power itself off cleanly to prevent a hard shutdown.
Another benefit of a UPS is that most common UPS’s can help “clean” the power as it comes to your computer through a feature called Automatic Voltage Regulation (AVR). What this does is helps correct minor fluctuations in the power feed coming to your computer, such as over-voltages or brownouts. If you’re not sure of the power quality in your home, or if you think it may be less than ideal, get a UPS with AVR. It’s a small additional cost to protect your equipment.
UPS systems these days are a lot more affordable than they were 10 years ago. I remember looking & seeing them in the $500 range. The one I recently bought for my Mac Pro workstation cost me $150 from Newegg.com. I bought a Cyberpower CP1285AVRLCD that provides 750W of total battery power. That’s overkill for my setup, but I wanted to leave room for more appliances should I decide to plug them in later. The UPS I have powering my router & cable modem is an APC Back-UPS CS 350, which is an older model that was given to me. It doesn’t have any of the latest features such as AVR, but it will keep my router & cable modem running easily for an hour on battery power.
Another common problem most users face when trying to choose a UPS is “How do I know how much power I need??”. This can be a daunting task for anyone who isn’t familiar with how much power their computer & peripherals use. APC has a good UPS calculator that can show you approximately how much power your system draws by picking which components you have.
However, I don’t recommend buying APC. In this blogger’s opinion, they’re overpriced. For a long time, they were the top name in UPS & power protection for anything electronic & over time they became a bit monopolistic in their pricing structure when compared to the features offered. Thankfully, CyberPower is the new up & coming player in that game & is earning a lot of respect in the IT community. You can get much more UPS for your dollar if you buy CyberPower. On top of that, the UPS management software that comes with CyberPower UPS’s is much better than APC’s in my experience. On OS X systems, you don’t even need to install anything, as OS X can talk to the UPS natively. To anyone who’s ever tried to set up APC’s PowerChute software, I’m sure they can appreciate keeping things transparent on the software side.
So bottom line is (if you skimmed through the post), get a UPS for your home PC’s, & make sure it’s a CyberPower UPS.
]]>For a while now I’ve been wanting to get a ZFS presence in my home just because it would be nice having the additional peace of mind that my photos & videos aren’t silently being corrupted without me knowing. In the past, this plan would have consisted of a dedicated mini-ZFS server running on a mini-ITX platform tucked away behind my desk. I remember pricing this setup out once before building off of a cool Chenbro box, but it came out to be ~$700 for 4TB RAW disk space. That’s a bit much.
Since Z-410 was announced, I’m back in the game. Using my Mac Pro, I have two options:
Option 1 is most attractive right now because it will still leave plenty of room inside the Mac Pro for other disks & I don’t have to give up my second optical drive bay. However, if I went option 2, I’m considering making those 2 2.5″ drives small-ish SSD’s for an additional perk, but it’ll cost more. I really can’t decide, but I’m leaning more towards the SANS DIGITAL enclosure at this point.
For the heck of it, I’ll post a poll that I’m sure won’t get used:
Let me know what you think!
]]>I’ve already started falling back into my old thoughts of selling my truck in favor of a more fuel efficient vehicle. I haven’t done it in the past because my truck is paid for, has had absolutely no mechanical problems, and is very handy to have when you need to move stuff around or for weekend projects. If I sold the truck & got a small car, what happens when I need a truck? Rent one? All of a sudden those little savings from gas prices take a hit.
Then I started focusing on the real problem… our dependency on oil as our primary fuel source. Assume for a second that there existed a perfect alternative fuel source that could directly replace oil. Battery power has it’s issues (batteries wear out & are very expensive to replace), Hydropower isn’t reasonable (water costs more than gas), Nuclear power makes everyone uneasy because they don’t want to blow up or die of radiation poisoning (:rolls eyes:). But let’s imagine for a second that there does exist a perfect alternative & most likely it would mean a different type of automobile. Would everyone automatically switch to it? I think not. Why?
For the alternative to take over as our primary fuel source, a lot of things have to change. Let’s assume the source needs to be replenished occasionally, as no fuel source yet is self-sustaining. So, we’ll need recharging/refueling/replenishing stations for the new source & we’ll need a lot of them. There are a few vehicles that run solely off of battery power, yet I see absolutely no battery charging stations to compliment the gas pumps at convenience stores. That means if I wanted to get a battery powered car, I have to be very careful how I plan my trips to make sure I can get back home, otherwise I’m walking.
The biggest change, however, will hit Americans where it hurts the most… their wallet. Here’s what I mean by that. If an alternative fuel vehicle were to become mainstream in America, our existing gas powered vehicles will become worthless. Our automobiles are one of our most valuable assets, and it is not one that a person is willing to see devalued to nothing. Right now, a person is willing to buy a battery powered vehicle only because they can sell the gas powered vehicle they own for it’s book value & recover some of the cost. What if none of the cost could be recovered? If an alternative fuel source vehicle were to take over, demand for gas powered vehicles will drop, and in such, their valuation will drop as well. A lot of people will not be happy about that. All of a sudden, that extra $20 at the tank every week doesn’t seem so high, does it?
I think we do need to end our dependency on oil, I’m just not sure how it can happen. Not too long ago, the US government tried an initiative that offered people an incentive to trade their gas guzzlers for more fuel efficient vehicles, and I think they offered a $2000 credit or something like that. I also think that initiative wasn’t very effective. I don’t personally know anyone who traded in. And that was nowhere near as radical of a change as changing fuel sources.
I started thinking back to how we made the change to oil in the first place. I believe our previous method of transportation was horse. I won’t count public transportation because that didn’t belong to any one person, or not everyone had their own, so coal is out. Most likely, the reason people were willing to adopt automobiles in place of their horses is because their horse was still worth something afterwards because it could still do things an automobile couldn’t. It was a slow transition to automobiles, but it was one that was easy to make & it did not have any (or much) negative effect on a person’s net worth.
The problem now is, the Industrial Revolution is over. People don’t have a big enough reason to make a big change in their lifestyle. They’re certainly not willing to take a $15k hit to their wallet to do so. What’s it going to take?
]]>#!/bin/bash if [ "$(whoami)" != 'root' ]; then echo "You have no permission to run $0 as non-root user." exit 1 fi export PATH=/opt/local/bin:/opt/local/sbin:$PATH port selfupdate port -d sync port upgrade outdated port clean --all installed >> /dev/null 2>&1 port uninstall inactive
The last two are just because I don’t like “extra junk” building up on my systems & by default MacPorts doesn’t remove previous versions or clean up after itself.
You can save the script, make it executable, & put it somewhere in your path so when you’re ready to update MacPorts, you can just type “sudo
I also considered scheduling this, but in my experience it doesn’t always finish successfully (usually due to a bad download of the sourcecode), so the process needs to be monitored while it’s happening. Otherwise, you could eventually wind up with a broken ports collection.
]]>