Why?
After using my VMware/NexentaStor All-In-One for a while, I grew tired of VMware’s bloat & limitations. Doing “cool stuff” in VMware requires a license, & vSphere Client only runs on Windows. I got tired of starting up a Windows VM just to manage my hypervisor. That’s the only thing I started Windows up for, and it got old. I wanted something I could manage directly from my primary OS, OS X, as well as lightweight & preferably open source.
There are plenty of hypervisor products on the market today, but I wanted to move to something open source & unix based. KVM has quickly become a big presense in this market, and for a good reason: it’s awesome. It’ll run on just about any hardware you have, and has even been ported to Solaris in the form of SmartOS.
What?
Host
Of the many great projects that use KVM, I chose Proxmox. Here’s a few of the many reasons why:
- It’s OSS licensed AGPLv3.
- It’s based on Debian.
- The management is all web-based & some CLI.
- It supports QEMU & OpenVZ.
- It supports OpenVSwitch.
- It has a good community.
- You can buy support if you want it.
I also checked out oVirt & plain KVM/libvirt on CentOS. oVirt was a bit too bloated for my tastes. KVM/libvirt on CentOS wasn’t web based, but I almost went with them because I could have ran virt-manager via ssh X forwarding. I liked the Proxmox project a bit better.
Storage
My original plan was to stick with NexentaStor, but I ran into issues with that. KVM’s equivalent of vmxnet3 & vmscsi is called virtio. With KVM, if you want maximum performance, use virtio wherever possible. NexentaStor does not have virtio drivers, so I couldn’t set up a VM of NexentaStor unless I used IDE for storage & E1000 for net. I was willing to compromise with E1000 for net, but IDE for storage wasn’t gonna work for me.
My secondary plan didn’t really work out either. This plan was to use OmniOS & Napp-IT. OmniOS is based on a newer illumos kernel, and therefore, I was able to get virtio type disks working. That process was a bit daunting because the OmniOS installer doesn’t include the virtio drivers by default, so I had to install to an IDE disk, pull in the virtio drivers from the pkg repos, attach a virtio disk, add the new drive to the root pool, then remove the old one. It was cool to do, but kindof a PITA. However, it was for naught, because trying to do VT-d passthrough to the VM caused it to panic. Word on IRC in #omnios was it had something to do with the USB/PCI code in the kernel. Sigh, back to the drawing board.
The third option was FreeNAS. Let me preface this by saying I will always pick Solaris/Illumos based storage first in the datacenter. A port of ZFS will always be second choice for me. That said, the FreeNAS project is a very good one. They also recently picked up some major talent with Jordan Hubbard, ex-Apple CTO. FreeBSD is alive & well, & still a big player in the ZFS community.
Imagine my surprise when I found out that FreeNAS includes both disk & net virtio drivers by default. A quick install later, and I had my storage solution up & running.
How?
I’m not going to cover the entire how-to beginning to end, because a lot of it is similar to VMware/ESXi. I will cover the major differences & how I worked around them.
Passthrough
The first obvious difference is VT-d PCI passthrough. VMware makes this easy to do. With Proxmox, it’s pretty easy too, just took me a while to figure out.
First, we need to prep Proxmox itself to use passthrough. The Proxmox Wiki explains how pretty well.
Second, we need to figure out the device ID to pass through. SSH into the proxmox node & become root. Then do:
1 2 | |
Let’s say your FreeNAS VM is ID 100. With FreeNAS powered off, you’ll need to manually edit the config file to add the option hostpci0: 02:00.0:
1 2 3 4 5 6 7 8 9 10 11 12 13 14 15 16 | |
Once you’ve done that, restart Proxmox. Once it comes back up & FreeNAS has been started up, FreeNAS should be able to see the disks attached to that controller. If they already have ZFS datasets on them, you can just import them & you’re good to go.
Network
When I first set up Proxmox/FreeNAS, Proxmox didn’t have OpenVSwitch integrated. As of now (v3.2), it does, though I haven’t played around with it yet. I plan to figure that out soon.
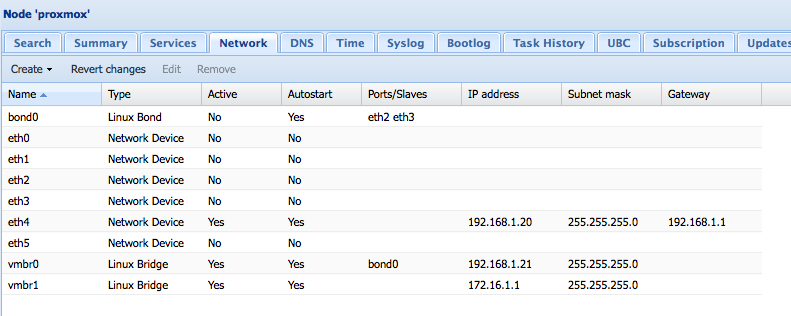
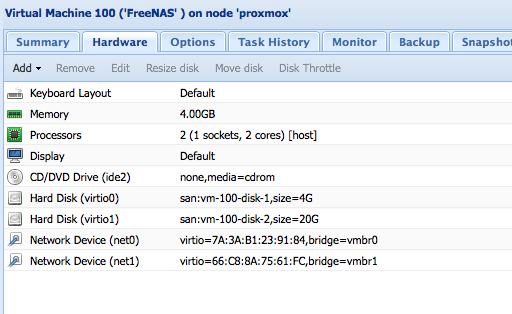
Proxmox uses Linux bridges for managing network interfaces. What I did was create a bridge called vmbr1 that was not attached to any physical NICs & gave it a private IP 172.16.1.1. From the FreeNAS side, I added a new virtio interface attached to vmbr1, and within FreeNAS, gave it IP 172.16.1.2.
Some pics to illustrate:
Proxmox Network Config:

FreeNAS VM Config:

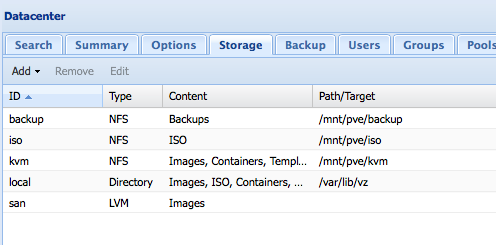
Proxmox Storage View w/ NFS shares mounted:

FreeNAS Disk View:

Finishing Thoughts
FreeNAS is a great ZFS solution for home use. It’s rich GUI & extensible plugins make it a lot of fun to use. For example, it has a Crashplan plugin which now handles all my backups. I’ve not been able to distinguish any performance loss from my ESXi/NexentaStor setup. Homelab loads just aren’t very high. I’m also really enjoying Proxmox, and the Proxmox devs are doing a lot of great things with it right now. It’s a very active project.
I’m really happy with how this turned out.